There’s nothing better than fresh baked bread. Every time I bake bread I’m amazed at how tasty it is, and how therapeutic the process is.
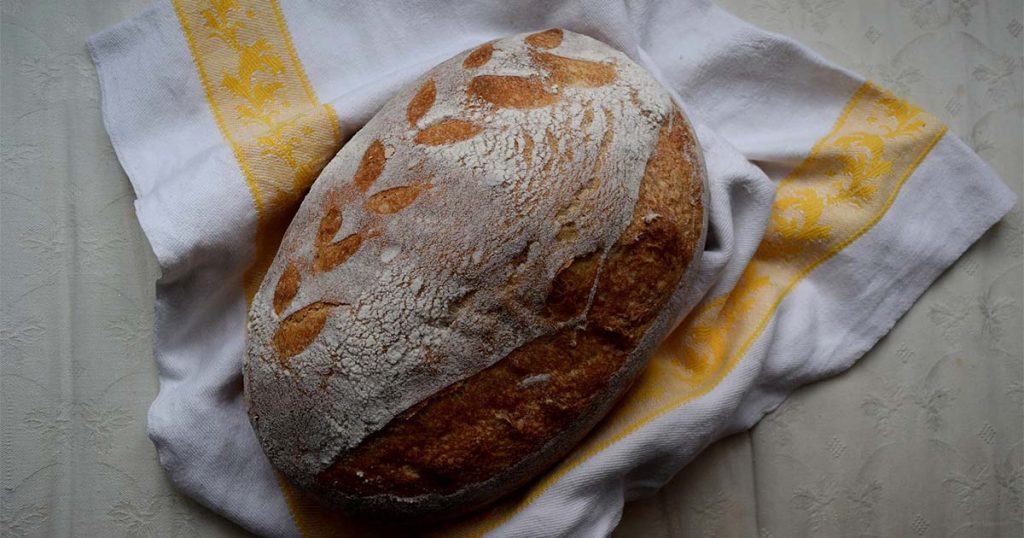
This recipe details how to make a round sourdough bread loaf flavored with fresh rosemary and olive oil. The bread will have a somewhat dense but soft crumb and a tangy, chewy, hard crust. Enjoy!
Sourdough Starter:
Sourdough Starters are the traditional way of leavening bread and produce flavorful breads. There are a host of starter recipes out there, but I recommend this recipe above all others for its simplicity and how it ties into my bread recipe. Your sourdough starter won’t be ready fro about 2 weeks from when you get it going so plan accordingly!
Rosemary & Olive Oil Sourdough Bread
Ingredients:
- 8 oz. Wheat Flour Sourdough Starter
- 12oz. Organic Unbleached White All Purpose or Bread Flour
- 4oz. Organic Whole Wheat Flour
- 8oz. Water
- 1 ½ tsp sea salt
- Mounding 1/8 cup Fresh Rosemary
- Olive Oil (will be brushed on the crust)
Instructions
1. Mix the flours, the starter and the water together in a large bowl, forming a nice bread dough.
2. Knead the dough by hand for 7-10 min. on a surface floured with Whole Wheat Flour (use the wheat flour for all kneading).
3. Cover with a cloth and let rest for at least 20 min. on a floured surface.
4. Add the 1 ½ tsp. of salt and the Rosemary to the dough and knead for another 10 min. making sure that the salt and rosemary are mixed in well and evenly distributed.
5. Take the dough and place it in an oiled (with olive oil) bowl. Cover with a lid, or aluminum foil and let it rest in a warm place for 3 hours. This rest lets the dough ferment giving it that sourdough tang.
6. While the dough is fermenting, work flour into the weave of a clean piece of fabric (preferably linen, but almost anything will do: an old tablecloth, napkin, or piece of canvas). Work the flour in heavily so that the fabric is coated. This floured piece of fabric is called a proofing cloth. Lay the proofing cloth in a large colander, a wicker basket, or even a bowl.
7. After 3 hours, remove the dough from the oiled bowl and shape it into a boule (basically a flattened ball). Place the boule on the proofing cloth inside the colander/basket/bowl and cover with aluminum foil or a plate.
8. Put the covered boule in the fridge for 12-24 hours. This long period of time allows the bread to develop complex flavors. A long rest is called a “rise” and a rise that takes place in the fridge is called a “cool rise.” Most yeast breads benefit from a nice long cool rise so expect to see this frequently if you continue baking bread.
9. After the long rest in the fridge, pullout the boule, uncover it and let it sit out for another 3 hours before baking.
10. Preheat the oven to 500. Put whatever you are baking the bread on/in inside the oven for the preheat. A large cast iron skillet works great; a bread baking stone is even better; but a cookie sheet also works just fine. Let the oven heat up for about 15 min. before you put the bread in.
11. Once the oven is preheated sprinkle some flour on your cooking surface and put the boule in the oven.
12. For the first 10min periodically throw some water out of a glass onto the sides of the oven being careful to trap the steam inside the oven with the bread. This will give the bread that nice hard crust.
13. Turn the heat down to 450 and bake for about 45min to 1 hour periodically turning the bread so that the crust browns evenly.
14. In the last 10 min of the bake, brush the crust with olive oil and sprinkle with salt (how much salt is up to you. How salty do you like your crust?)
15. The bread is finished when the crust is a nice rich brown color and it just looks tasty. More time in the oven is better than too little time. Err on the side of lengthy baking.
16. Pull out of the oven and place it on a cutting board or a rack to cool. Let the bread cool completely (or nearly) before you cut into it.
17. Enjoy!!
Tips
– It is best to weigh your ingredients rather than take measurements by volume. This is most critical with the starter, the flour, and the water as these are the primary ingredients and should be in the proper proportions on order for the bread to develop well.
– Don’t skimp on the kneading! Kneading your bread is an extremely important part of the breads ability to rise. As you knead you are mashing up the proteins in the flour and releasing gluten. The gluten allows the bread to capture gases that the yeast exude creating pockets of air that give bread its wonderful spongy texture.
– Longer on the cool rise in step 8 is better than shorter. The longer you let the dough rest, the more complex the flavors will be.
– A sourdough starter of white flour can be easily substituted for the wheat starter with no ill effects.
– Keep your proofing cloth for your next loaf! Don’t wash it, ever. Just shake out the excess flour and store it in the freezer with your flour. The cloth will develop some wild yeast populations and flavors of its own over time.